Showing posts with label WWII. Show all posts

Friday, 19 August 2016

Bi-curious Italians Hungry For CoC

With Operation Stag out of the way - and the majority of us extracted from the jungle with only minor damage to our sanity - I can once again contemplate some hobby activity which doesn't solely consist of repetitively cleaning up and basing an entire Battlefront PAVN infantry battalion.

The horror... the horror...

Numerous distractions aside (15mm ACW anyone?), my main aims for this year were to get a 6mm Soviet force together for Team Yankee and to use the numerous 15mm WW2 miniatures I own (initially purchased for Bolt Action) to give the supposedly far superior Chain of Command a go.

The book features the usual high quality Lardy production values...


Ostensibly, it shouldn't be too hard to switch from 1940k to Chain of Command. The basing conventions are the same (no pesky element bases), both systems represent combat at a platoon level, and whilst the range of hardware available in the supporting list can be pretty wide it seems from a superficial reading of the CoC rules that you are likely to be fielding far less supporting units. So any viable and faintly historically accurate Bolt Action platoon should be pretty much ready to go.

But I then got thinking about one of the more unique mechanics of Chain of Command - and the aspect that got me interested when I first heard about it - the Patrol Phase. During the initial deployment stage, both players take part in a mini-game which represents them reconnoitring the board and attempting to find and 'fix' their opponents in play to gain a tactical advantage against them when they deploy their forces. Or that's how I understand it at least... I've not actually played yet!

Given that we will be playing the rules as written, just scaling down to 15mm for a slightly more realistic experience as we did with Bolt Action, this offers a fun hobby opportunity with regard to the Patrol Markers and Jump-off Points. The rules state that Patrol Markers should be approximately 2.5" in diameter, and when playing in 28mm that they should feature some appropriate national symbols to denote which is which. 2.5" is close enough to the 60mm MDF bases I have kicking around for government work, and in 15mm is more than large enough to put together some cool little dioramas representing the various reconnaissance forces each side has at their disposal.

The title of this photo is 'Jeep Mania', which is an actual condition that Tom has.

(This totally wasn't my idea by the way - but it seemed far too good of one not to pinch. I've now long forgotten where I first saw it, but it might have been on www.lead-adventure.de)


The rules are a little bit less clear about Jump-off Points ("...an unobtrusive vignette...") but similarly offer an excellent opportunity to build some characterful dioramas - and Battlefront and other companies already produce a number of theatre-specific Objective Markers which would work really well and which take up the same dimensions as a large Flames of War base, so this will be my starting point. In fact, I already own one for the Italians of an officer sitting down to his spaghetti!
 
Other Italian cultural stereotypes are available...

Initially I was just thinking of adding to my existing Paracadutisti Nembo force and going from there. However, there aren't actually any published army lists for Mid/Late War Italian Paratroopers - and whilst there are some useful tools out there like the Coc Calculator to help you work out your forces, and bloggers like Andy Duffell over on Tiny Hordes putting out some exhaustive lists for the Italian Theatre of their own devising, it seemed sensible to go with one of the Lardies own published force lists for my first foray into Chain of Command.

Fortunately for me, Too Fat Lardies have been very good at supporting Chain of Command over on their blog Lard Island - releasing lists for plenty of theatres which fell outside of the D-Day and beyond scope of the main rulebook, including some very interesting ones which proceeded WW2 altogether like the Spanish Civil War and the Abyssinian War.

The most interesting theatre for me though has always been North Africa, and in particular the early stages of the conflict- when men were men, tanks were awful, and armoured cars went 'swanning around in the blue'. Luckily again the Lardies have me covered, with lists for both the Italian army in East and North Africa in 1940 and the early desert British circa Operation Compass.

Whilst they've never properly graced the table outside of the odd game of Tank War, I do actually have quite a few North Africa miniatures for all the different sides, in various states of completion. This includes a whole Flames of War Bergsagilieri Army - painted to a far higher standard than I could muster - bought off eBay a while ago. Why not use Chain of Command as an excuse to whip my existing miniatures into shape and start getting them to the table? Why not indeed.

One thing I won't be doing, however, is bettering this amazing Afrika Korps objective marker...!

There is also a mini Indiana Jones, with mini anachronistic Panzerfaust. AMAZEBALLS.


Friday, 22 January 2016

Paracadutisti Month 3 - Well, someone has to sell the ice-cream

Month 3 marks the start of everyone's second platoon, and also the halfway point for those of us looking to build a whole company (errr... hopefully that isn't just me). As we agreed at the beginning of the escalation league, starting a second platoon also means that you need an HQ, in addition to the compulsory two sections and a lieutenant.

Given that I don't want to change the composition of my veteran late-war Paracadutisti squads, and even opting for the cheapest non-inexperienced officer that I can (a regular Captain) in addition to a regular second lieutenant, that will still constitute... all of my points for this month. Not even enough left over to buy him a little Fiat 500 Militaire staff car, as so ably modelled below. Oh well, at least there are no agonising decisions to make this month.
 
If only Britney Spears had been wearing puttees and jodphurs during the infamous gussetgate incident...

Since list building this month was a complete no-brainer, you might expect that I'd anticipated the miniatures I was going to need and already finished painting them. And you would be wrong. Still, I made a start today by getting the miniatures cleaned up and onto their bases, and if the heavens don't open again I should be able to get them undercoated too.

The silver lining to the lack of options this month is that another 500 points at least gives me the opportunity to finish up a coherent platoon of Paracadutisti from the same range, and painted in the same camo. I changed both manufacturer and colour scheme halfway through my last platoon, so my force is looking like rather a mixed bunch at the moment. In particular, I moved away from using Battlefront's Flames of War Compagnia Paracadutist miniatures - most of whom are wearing shorts, and look far more suitable for Paracadutisti Folgore in North Africa than for fighting on home soil - for Eureka's excellent Paracadutisti who are clad in much bulkier gear, supplied by Fighting 15s. Once I've finished the miniatures for this month, I will at least be able to scrape together a full platoon of the latter.

With half an eye on Chain of Command, I'm also going to take the opportunity to work on some support units and squad options which I haven't chosen for Bolt Action but which I will likely require for CoCs more proscriptive list building. So into the painting queue go some LMGs, an MMG, and a medium mortar. I'm also casting around looking for things I can use to put together some diorama-style reconnaissance markers and jumping-off points (more on that later)...

Friday, 15 January 2016

More 15 in 2016

We may have run out of steam a little after month two (not in the least because Ed appears to have adopted the Fabian strategy that if he doesn't buy any miniatures, he can't technically lose a game) but it's now a new year full of new opportunities to miss painting deadlines.

At the very least I would like to use the next 500 points to round out a full Bolt Action platoon of Paracdutisti (with options) that we can then use in the newer, shinier and more Henry Hyde approved World War 2 games such as Chain of Command and Battlegroup which are already starting to turn heads in our gaming group - including mine.


Plus, it seems rather chulish to bring our Italian campaign to a close just before Warlord Games release their theatre specific book for the Mediterranean conflict, backed full of juicy new scenarios...

Duel in the Sun comes out on the 20th February - making the 25th a good deadline for 1,500 points.

Tuesday, 1 December 2015

Month 2: Blue on Blue

So the clanking of treads and rattle of machine guns have gone quiet and the dust has settled on month two of the Bolt Action escalation league.

Scores on the wars are..

US Airborne
184th Italian
Gebirgsjager
H.G. Division
US 3rd Infantry
Win
3
2
1
1
0
Loss
0
1
2
2
2
Draw
0
0
0
0
0
Played
3
3
3
3
2
Points
9
6
3
3
0

3pts for a win 1pt for a draw
This month saw the jeepborne airborne and the Italians go head to head for top dog. The HG Division even managed to snag a win dragging the Gebirgsjager down to their level.
Campaign

This puts the Allies further ahead. As the second game was blue on blue only the US/Italian game counted.
Axis 2 
Allies 4

Hobby

Everyone completed their allotted painting tasks, although for some it was touch and go (thankfully for me the check in was delayed a week). 
The US 3rd did not see the field due to a bout of illness striking their HQ.
Player
1000 Pts Painted
Games Played
Blog Post
Jon
2
2
2
David
2
2
2
Ed
Bye
2
2
Tom
2
2
2
Darren
2
1
2

Month 3

So final month is upon us already and we all have our final 500 points to add,  remember:
  • You can field a single platoon for every 1000 points so you can field a second platoon now.
  • Each platoon must include a platoon HQ and 2 Rifle Squads.
  • If you include more than one platoon then you must include a company HQ.
  • Lists are chosen from the basic BA selector with FOW lists for Italy used to dictate equipment and general organization.
  • Units can be chosen from the above based on a time frame of Sep 43 (mid war) to Jun 44 (late war)
  • You must keep the original list fielded last month.
  • No vehicle over DEF 8, Forward Air Observers or Forward Artillery Observers in the first 500 points.


Monday, 2 November 2015

HG Fallschirm-Panzer-Division 1 Hermann Göring - Month two

So. Month 2.

My current score: 0-2

Joint bottom of the leader board with Darren, with him edging ahead of me on 'painted miniatures difference'.

Relegation form and no mistake. 

The chaps don't look too dispirited in the dressing room

Sunday, 1 November 2015

US 3rd Infantry Division Month 2

OK so month one was a bust with two losses, what can we do in month two...

What caused the biggest problems in month 1? The enemy scoring cheap kills using snipers to one shot my MMG teams, and the difficulty of rooting out infantry in buildings.

Clearly I'm going to need something to neutralize enemy snipers.

Saturday, 31 October 2015

Paracadutisti Nembo Month 2 - The Merchants of Menace

After two victories from two games (including one where my opponent made a do-or-die grab for the demolition objective, only to be destroyed by my HQ!) I'm feeling pretty pleased with Paracadutisi Nembo. Granted, I got a rather salutary lesson in the damage that 'Hitler's Buzzsaw' can wreak even on Veterans on the way, and am yet to play Tom's extremely broken Jeep list yet. But nonetheless I'm feeling confident enough to be the first to post the army list for my next 500 points, and risk ceding the meta to lesser players like Darren and Ed...

Now that's the obligatory trash-talk out of the way - on to the list.

Wednesday, 7 October 2015

Bolt Action First Action

So everyone got at least one game in tonight with their 500pt lists, some of us had the pleasure of playing losing two...

US Airborne
184th Italian
Gebirgsjager
H.G. Division
US 3rd Infantry
Win
2
1
1
0
0
Loss
0
0
1
1
2
Draw
0
0
0
0
0
Played
2
1
2
1
2
Points
6
3
3
0
0

Luckily the US Airborne held up their end for the Allies
Campaign

Axis 2 
Allies 2


Sunday, 20 September 2015

184th Divisione Paracadutisti Nembo

It's not my fault. Honest. I'm not an evil person per se - it was just that I couldn't take it any more. All those snide little remarks. The derrogatory comments. The constant jokes at my expense. And I happen to know just what will wipe that smile off their faces.

Allow me to explain...

When I'd first pitched the idea for a Bolt Action escalation league, I'd suggested the Italian theatre amongst others in an attempt to maximise the number of possible playable factions (not that it did a lot of good - the draw of the BROKEN American list proved too strong). The response was... not a positive one. 

"The only time anyone ever wants to play the Italians is if you're playing Ancients!"

"Errr, actually guys if you take a look at the Italian list I think they'd be pretty competitive. Lots of elite troop types, cheap armour, and some pretty nifty tank destroyers - "

"Oh really? How many reverse gears have they got?"

"Do you mean tank destroyer, or do you mean an ice-cream van?"

"LOL, RUN AWAY!"

Right, I thought. I'll show them! I'll write the sleaziest, beardiest 500 point Italian list I can. If only there was something in here that will really scare them. Oooh, what's this - a light tank that counts as an armoured car choice? And with a flamethrower, no less...? Mwahahahahaha!

At least those were my initial thoughts. This list almost died a death at a very early stage when I looked through 'Armies of Italy' and realised that - unlike the SPACE MAFINNS - the Italians don't have access to Panzershreks. Despite the plentiful historical evidence they were issued with them by the Germans. And the fact that Battlefront do some nice models of Italians armed with them. AND ALL BECAUSE WARLORD GAMES NERF THE AXIS POWERS WITH BROKEN LISTS IN AN ATTEMPT TO REFLECT WHY THEY LOST THE WAR, RATHER THAN LET SKILLED PLAYERS LEAD THEM TO VICTORY BECAUSE BRITS HATE TOURNAMENT GAMERS! *Cough* Sorry, I appear to have been channeling (the now defuct) boltaction.net there. Anyway, I'm not convinced that any mid- to late-war list can be viable without man-portable anti-tank weapons.

Fortunately, whilst looking through the errata for a rule which said that because one very lost Finnish soldier had fought in Italy I could have force selectors for a whole platoon of them in Bolt Action (I'm looking at you Lauri Törni - after all, he seemed to get pretty much everywhere else), I came across the additional units pdf and the Late War Paracadutisti Infantry Section. Panzerfausts! Three! For every squad! That's what I needed.

Commando Comics called - they want their art back.

I was also reassured by the note regarding theatre selectors, which state that they can be used for Anzio - Paracadutisti are a notable omission from the Anzio theatre selectors, I suspect because Warlord initially only intended them to be used to represent Folgore in North Africa - or for the units that kept fighting on the Axis side until the end of the war. One of the niggling concerns when I chose to play Italians was that the September '43 armistice would seriously limit their utility without stretching historical accuracy to breaking point. I mean, I knew that Battlefront had Flames of War lists and miniatures for late war Italians - and they wouldn't lie to sell miniatures, right? Right...? But for the purposes of not being called a cheating bastard by my opponents, it was nice to have it written down in black and white by Mr Caviatorre.

The limited number of units that sided with the Axis after the Armistice rather than throwing in their lot with the co-belligerent forces, and the aforementioned requirement to include paratroopers, also made it easier to tie my Bolt Action force to a particular historical formation. The Bolt Action pdf mentions a newly raised Nembo division which took part in the defense of Anzio and Rome, and some further research revealed that they were formed out of the 185 Airborne Division Folgore - double hard bastards I already knew all about from the North Africa theatre.

The 185 Parachute Regiment of 184th Airborne Division Nembo were sent to reinfore the Italian forces on Sicily after the Allied landing - albiet arriving too late to do anything other than form a rear guard as the remaining Italians and Germans were evacuated to the mainland - before posing a fierce resistance to the 8th Army and Canadian troops during the landings in Southern Italy. The majority of the 3rd Parachute Battalion of the 185th then sided with the Axis, and fought to contain the Allied beach-head at Anzio - and continued to fight on after that, eventually being one of the last Italian units to surrender, in May 1945. So much for my concerns about utility! Looks like I'd found a historical formation to model my models on.

Collar insignia of 184th Divisione Paracadutisti Nembo. And no, I'm not painting it in 15mm...
With the research done, I got to list building. Unsurprisingly, Late War Paracadutisti are veterans - so I knew I wasn't going to get many of them for 500 points. I do however need two squads for a viable platoon - and since they're the only troops I'm going to get, I might as well take them at full strength. Two squads of ten (allowed for Late War Paracadutisti, rather than the Folgore squads of nine in 'Armies of Italy') it is then. My first reaction was to cram them as full as SMGs as I could afford - any man can take one - but then thinking about the way the Italian 'Defensive Strategy' rule was going to force me to play, not to mention the MMG spam I was likely to be facing from Darren, I decided to stick with rifles. I also decided not to take an LMG, since as a group we are not actually convinced they offer much advantage if you aren't playing as the Germans. Similarly they won't need Panzerfausts in the first 500 points, but I will certainly be revisiting that option next month and giving them as many of the things as they can carry (sadly only three - and as a unit, not each). I will also definitely be taking the 'Stubborn' rule (it's free) as it might save them from being wiped out by a lucky mortar strike.


The stereotype-challenging Paracadutisti Nembo. Note the 'samurai' style SMG magazine pouches.

And then for my (now not so secret) secret weapon - the L6/40 (well, tecnically an L6 lf). This is a shoe-in as it is only 95 points, about as as well armoured as any of the tanks available to me, and yet still counts as an armoured car. Plus, did I mention it can take a flamethrower? To be honest, the light automatic cannon would probably be just as useful at 500 points (2 shots of D2 HE at 48"), but the psychological effect of the flamethrower on other players, let alone on their units, is more than worth the additional ten points. As I suspect it will be drawing a lot of fire, it at least has to be regular. And since I'm facing at least two cheesey American lists that I just know will be dripping with bazookas, I also need something up my sleeve to try and ensure that the L6/40 doesn't get taken out as soon as it comes on the board. A regular sniper will do nicely - plus I know Darren dislikes facing them - and combined with my other choices brings me up to a total of 435 points. 


This is what fear looks like in Bolt Action.
Of course, the problem with being a devious bugger is that you assume that everyone else is capable of the same baseness as you are. Is there a cheap vehicle that one of the others could take in their lists which would seriously upset my plans? Both the US and British get the M8, but at 110 points for regular for something which is open-topped, I doubt anyone will be fielding one. What worries me more is the potential for one of them (well, Tom) to bring a M3 Stuart, or even a Stuart Satan... in go two panzerfausts to each Paracadutisti squad. Still, thinking about it those are both tank choices, and neither of them is going to want to waste a tank slot at this stage when they can have something much better in the next 500 points... so out go the panzerfausts again.

Have I forgotten anything...? Oh yes, a platoon HQ! At this point he seems like a bit of an afterthought, since as stubborn veterans the Paracadutisti hopefully won't need much external motivation, but I have to take one. I have the points to make him veteran, but might as well keep him regular (arf arf) and give him a guaranteed wound soak in the form of an aide instead. 

So there you have it - the elite paratroopers of 184th Divisione Paracadutisti Nembo. If I'm honest I'm a little worried about the lack of order dice, particularly given that I will need to eliminate any anti-tank weapons as swiftly as possible to properly bring the L6 lf into play, and I have a strong suspicion that my two squads will just be pinned out by weight of fire - but it will be nice to be facing regular forces as veterans, and if you've only got five order dice to begin with then it is hard to lose three more than the opposing player so the 'Avanti Savoia!' special rule shouldn't come into play in our 500 point games at least. Yep, overall I'm reasonably satisfied with this list. Still 5 points to play with too - oh go on then, just the one panzerfaust for one of the squads... There. All done.


Thursday, 20 November 2014

Battle Report: The Bridges over the Desna - Autumn 1943

As the morning mists rolled away from the shallow valley of the Desna, a thin front line of German troops stirred in their trenches. From the other side of the river, beyond the low ridge came a single red flare, followed quickly by the sound of incoming artillery fire. 

Turns 1 - 3

Soviet artillery rattles off attacks on the woods and the farm, missing the dug-in Germans in the woods but suppressing the German mortars in the track-side farm.

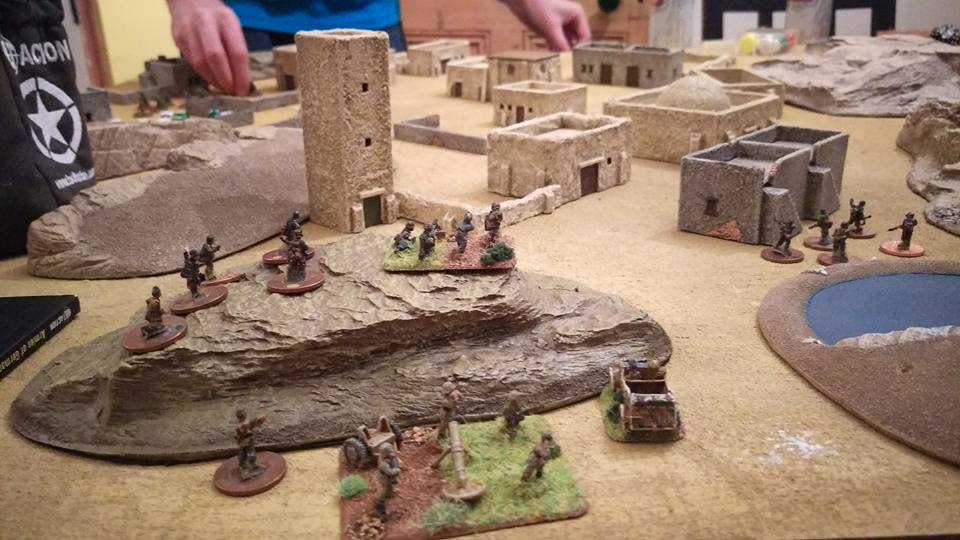
Smoke from the barrage drifts across the woods while the farm burns in the background


Tom re-enters the room to see little tufts of cotton wool where his barrages have landed but none the wiser at to their effect. He immediately sets his motorised column off down the roads while his foot-slogging troops and the SU-76s head off down the railway line. Both flanks manage to get a 2nd order off after their 'free' move and gun/shuffle forwards (delete as applicable)

Soviet motorised column heads towards the river


Jon von Cleweswitz responds by moving up his Stugs and Wespes and ordered his Pioneers forward to the bridges in their transports. In a sign of things to come, a second order results in a blunder which sees the CO unit shuffle backwards and then move back to the top of the hill at the end of the command phase.

Soviet artillery is even less effective in turn 2, failing to suppress either of the dug in Paks on the hill. Not that Tom even knows that they are there. He just sees more drifting cotton wool on an empty hill. Never mind. I'm enjoying myself.

The German defences at the start of turn 2


The Soviets rumble forwards, with the troops on foot heroically outpacing the trucks. Not that the trucks are going to get very far. Having divided at the ruined village, they press on down the roads to the centre and right, only for Jon to reveal his mortar stand and, with a typically jammy snake-eyes, proceed to smash up the lead trucks on central road, creating a traffic pile up.

Once again, the artillery is useless. Tom decides to activate his right flank first, only for Jon to spring his next trap, 2MG stands and a Pak hidden in the woods on his left. Using opportunity fire they destroy the lead truck and it's unfortunate passengers and suppress the next truck. Spooked, the Soviet HQ stand commanding that flank blunders his next command roll, not only leaving his line of trucks strung out in the middle of the road in front of a german guns, but permanently lowering his CV by 1 to a measly 7.

Burning trucks on the Soviet right and centre


On the left the SU-76s fail to move but the swarm of infantry shuffle forward of the train station.

The chaos on the Soviet rights is clearly infectious as the Germans facing them fail to get an order off, leaving Jon cursing his luck. He'd fancied that his MG/Pak combo would have lots of fun with a line of stationary soft-skins. He compensates by bringing up a Wespe which does make light work of another truck. The mortars on the other flank also fail their roll and twiddle their thumbs while whistling the Horst Wessel lied.

Turn 4

No barrage to start the turn so Tom can stay in the room. His Recce stand is too far away to try to impersonate a Forward Artillery Observer so I've no need to reach for the bag of cotton wool.

The big news is that Tom's tank force arrives. Or rather it doesn't as he fails his roll for mobile deployment on his left flank near the railway line. Cue a disappointed GamesMASTER who's first big surprise for the German's has turned out to be a bit of a damp squib.

With the HQ of the motorised column a gibbering wreck, the Soviet CO takes command of the flank and orders all the trucks off the road into the ditches and cornfields. Sadly they don't succeed in deploying their guns or unloading their infantry.

The SU-76s stall again but the heroic hordes once again advance faster than the trucks.

In response, Jon's left flank fail again, seeing their juicy targets melting away into the undergrowth. The mortars manage to suppress one of the SU-76s and the right flank Wespe destroys the lead MG stand of the fast approaching Soviet left flank.

Turn 5

The SU-76s are the heroes this turn, pouring fire on the trenches by the railway embankment. Not that it's hard to be heroic by comparison when the rest of your force fails it's command rolls. Only the long-suffering foot-cavalry on the left continue to advance, perhaps clogging the entry routes for the tanks who once again fail to arrive.

The inexorable advance of the Soviet infantry


The Germans respond to the slowing of the Soviet advance by finally getting an order off with their own left flank in the woods. Two trucks, their towed guns and their cargoes are wiped out while the Pioneers disembark into the bridge-side trench.

On the railway flank, the Wespe moves up onto the railway embankment to get line of sight to the masses of infantry advancing on the bridge, while the Stugs move up in support. The mortars pound away fairly ineffectually at the hordes too.

Turn 6

Firstly the failures: The recce fail to order an artillery strike and the tanks fail to arrive AGAIN! (Note to self, the tanks should really arrive automatically)

However, both infantry blobs do get orders off. The left flank open up on the Wespe with mortars and suppresses it. The rest of the troops roll ever closer to the bridge. The right flank does finally manage to disembark and unlimber their remaining guns, still some distance from the bridge.

The Soviets are now close enough to the railway bridge for the Germans to get some shots off in the initiative phase. Sadly that's about as good as it gets for Jon as both flanks fail their orders and the CO has to step in to move some reinforcements in their transports up from the backfield to a position behind the farm from where they can reinforce the battle for the railway bridge.

(I was planning on dropping the change of orders bomb on the Germans in turn 6 but as the tanks haven't showed yet, I decided to delay until later in the game. As it stands, the Germans are barely engaged. Afterall, the umpires' decision is final)

Turn 7:

Tanks!
The tanks finally arrive! And are greeted by a chuckling Jon revealing his Paks on the hill-top. Two T-34s are suppressed by the opportunity fire but the frustrated tankers get a further two orders off, advancing onto the bridge and wiping out the Wespe on the embankment. Their supporting infantry lay down fire on the German trenches around the bridge while the other flank shuffles forwards without seriously threatening either of the bridges to their front.


The Pakfront responds

At this point (and in retrospect too early but you know what it's like when you've got an exciting secret to share) I reveal to Jon his new orders:

"Despite our fanatical resistance, the enemy have overrun positions to the south of your sector. All Corps reserves are committed to contain the breakthrough. You must blow the bridges to delay the enemy to your front and then withdraw in good order down the road and railway towards Chernigov


The Soviets threaten Corps rear echelon. The prospect of a local counter attack has evaporated. These forces are now committed to a terrible struggle to keep open your lines of retreat. To avoid being overrun, you must now destroy the bridges and then extract your remaining forces as swiftly as possible via the roads to the rear.

This replaces your previous victory conditions. You will now score for both destroying the bridges and for units successfully withdrawn."


Jon responds as any good commander would and rushes his Pioneers onto the bridges to light their fuses, covered from the front by infantry stands. The only other action is that Paks brewing up the lead T-34 on the railway bridge, creating a fiery roadblock which only infantry can get past. A quick discussion concludes that another tank could push it out the way but that an infantry section might struggle to tip a burning 27 tonne tank off the bridge.

Now this is where the concept of the game as I'd envisaged it runs into the rules and player behaviour. According to the BKC rules, engineering actions are carried out in the Initiative phase. I'd ruled that Jon's pioneers needed to be 'on' the bridges to blow them as I'd worried that otherwise he'd simply be able to sit in the trenches and pop the bridges on the infamous 'anything but a 1', leaving the Soviets stranded on the far bank and allowing the Germans to withdraw at their leisure. However, as we shall see, this meant that Jon had to leave his pioneers in the open on the bridges for a full Soviet turn before his chance to blow them on his next initiative turn. And Tom responded as any sensible gamer/commander would and poured fire on the exposed sappers. With the benefit of hindsight, I needed a compromise to allow the sappers the chance to carry out their demolition from a safer position while making it harder to achieve. I think that carrying out an engineering action from an adjacent trench while needing a 3 or 4+ would have made it more fun/more tense for all concerned.

Anyway, this is what actually happened next...

Turn 8:

Initiative fire at the railway crossing sees the covering infantry unit suppressed  while the SU-76s wake from their slumbers to make short work of the pioneers on the central bridge.

The foot-slogging horde produce a timely double 1 and use their two orders to blow the engineers off the railway bridge. Now it's all down to the sappers on the German left flank. (clue- they also die to heavy mortar fire)

At the railway bridge, the Soviet infantry cross the railway bridge and begin the work of clearing the Germans from their trenches while the T-34s pour fire on the Paks, damaging but not suppressing them.

In the centre the Soviet assault is held up by the wire strung across the road while the Russian right flank still dithers.

Soon to be deceased Pioneers on the central bridge


Jon. mourning his dead pioneers, fails with an infantry unit to blow the charges on his left while initiative fire suppresses the lead Soviet infantry in the centre. However, on the right flank, too much of the infantry is suppressed to do anything about the wave of enemy infantry pouring across the railway bridge.

On the left, a successful order roll allows Jon to push his infantry all up to the bridge, figuring that 3 units might conjure up the 6 needed to blow the bridge while his MGs and Paks stop the closest Soviet infantry in their tracks.

In the centre, a vicious counter attack sends the red infantry reeling back, with multiple supporting units suppressed.

Take that Ivan!


On the right, the Paks & continue to hammer away at the looming threat presented by the tanks and infantry crossing the river.

Turn 9:

In the initiative phase an assault by the Soviet infantry clears the trenches by the railways bridge, sending the German infantry scarpering for the  shelter of the farm. A successful command roll sees the infantry move up, mowing down the retreating Germans but the lead unit is suppressed on the bridge by the Stugs, blocking the path for the units behind including the armour. Then, in a cinematic moment, the previously downgraded HQ stand, reduced to commanding the heavy mortars in the backfield blunders, calling down fire on the unit nearest to an enemy stand. This just happens to be the unit suppressed on the railway bridge and they are wiped out, clearing the way for the armour. The T-34s move out, shoving their unfortunate comrades' burning tank out of the way.

The tanks are across!
 

The Paks respond with opportunity fire which suppresses the lead T-34 while the SU-76s zero in on the Paks, blowing one to pieces despite the protection of it's gun-pit

With his hopes of blowing all the bridges evaporating, Jon focuses on the second part of his orders and focuses on withdrawal of his remaining forces. I'd rather hoped that he'd have committed his reserves by this point, but in fact he has some 9 stands of infantry and 17 transports uncommitted.

On the right flank, a timely 'retreat' blunder helps to begin the extraction of the mortars, Stugs and half tracks, while on the left, the MGs keep up covering fire, wiping out another Soviet infantry stand while the Wespe pulls back and a half track rumbles up to hitch up the Pak and pull back down the road.

In the rear, all of the uncommitted half tracks and trucks pull back off the table edge while a solitary half track head up the hill to extract the remaining Pak.

Turn 10

Things are starting to get real for Tom. He's got 3 turns, including this one to try to press his advantage and prevent the Germans retreating in good order.

Sadly, with the notable exception of an artillery strike that crumps one of the retreating Paks and transports, everything else fails it's orders. Only the SU-76s succeed in veering from the left flank towards the central bridge before bogging down in a field.

For Jon, this turn begins with a bang as the left flank bridge disappears in a cloud of smoke and shattered masonry. Sadly a cruel umpire ruling leaves one of the German units on the bridge at the time stranded on the Soviet bank. Oops. I am evil.

Wot no bridge?


While the left flank units pull back for three activations and are close to escaping, their towed Pak and Wespe outrunning them and making the table edge, on the right, the remaining Mortars and Stugs fail their roll, leaving them stranded strung out along the railway line.   

Turn 11

Things are even worse for the Soviets as command roll after command roll are failed. Happily for Tom, the only exception are the tanks, who sweep forward, destroying the mortars and suppressing a Stug.

For Jon, his only success is withdrawal of the remaining left flank units in good order.

Turn 12

And so to the climax.

Tom has his eyes on the German table edge. His T-34s gun forwards but fail that final roll and end up agonisingly short. Surely the Stugs and the CO stand can now simply slip away from the trap to fight another day.

Well if only. Sadly for Jon, and amusingly for the rest of us, he concludes the game with yet another blunder when ordering the Stugs. Attention is focused on the last 2D6 of the game as I consult the blunder table. An 8(?)! How amusing. As Karma for the previous blunder aiding his withdrawal, this time it's 'advance your full movement rate towards the nearest enemy'. So yes, we conclude with 2 Stugs ramming the lead T-34s in a desperate, cinematic attempt to prevent them overrunning their retreating pals

Crunch!


I declare that the Soviets have achieved a minor victory. They've crossed the river in force and fallen just short of the German exit point on their left. However, the Germans have withdrawn around half of their force intact with their all important transports, leaving a litter of self propelled guns and a scattering of destroyed stands behind. They live to fight another day.

To the victor the spoils (rumours of drunkenness in the Soviet command are clearly Nazi propaganda)


A reckoning of casualties shows that:

The Soviets had lost: 12 Infantry stands, 1 MG stand, 3 trucks, 1 T-34, 1 ATG and 1 SU-76

The Germans had lost: 10 Infantry stands, 1 MG stand, 1 Mortar stand, 3 Pioneer stands and their transports, 2 Paks, 1 Wespe and 3 Stugs.

 Conclusions:

Well firstly, I think we all had a good time. I was a bit worried that an umpire moderated game might end up only being fun for me as the umpire. I'm sure we've all played RPGs where the GM has enjoyed themselves mightily while railroading the players through a story he enjoyed reading. In fact our group - as previous posts on here show - have developed a style of play seemingly dedicated to avoiding interacting with the actual scenario when RPGing.

Talking with Jon and Tom afterwards, it was clear that Jon had a plan to draw the Soviets onto the railway bridge and then blow it, (even prior to receiving his replacement orders) forcing the Soviets to swing back to the centre under the sights of his Paks, while Tom was happy to rush the bridges on all fronts and react as the Germans were revealed. They say that no plan survives contact with the enemy and I was glad to see them both interacting with their orders and broadly defined victory conditions rather than feeling constrained by them or missing the usual 'have one unit within 2" of the objective marker' victory conditions. 

Did the scenario achieve what I'd been looking for? Broadly yes. I've ruminated above on some possible changes to the mechanics of blowing the bridges but otherwise I think we produced a game that achieved surprise - both in terms of hidden set up and changing orders - and that differed considerably from the usual stand up fight, last man standing competitive games we play. I've not played a game before where the losing player was so proud to have withdrawn a part of his forces intact and to have blown one of the 3 bridges.

The success of the game was helped by the BKC rule-set. While it's not perfect, and can be quite dice heavy at times, I think it does encourage a play-style that  rewards using your forces in a way that models history. Dug-in troops are hard to shift from range, suppressing support troops prior to launching an assault is crucial, etc. I think my Soviet free advance rule also helped get the scenario moving. Having the bulk of the Soviets sitting around for the first few turns would only have slowed things down and allowed more of the Germans to stay out of the fight.

Lastly how did I find being the umpire? Well I enjoyed it immensely. It allowed me to grandstand to a degree which is always fun. I had to be on my toes with the hidden set up rules which meant I had to concentrate - no bad thing although it did limit my smoke breaks. I had to be neutral despite seeing Tom criminally mishandle my lovely Soviet stands (jokes!) and I had to be flexible without being unfair, as seen with the delay to the German orders and some mid-game rulings on the use of engineering units and how to tip a burning tank off a bridge. I think I could have held off giving the German replacement orders for another turn or two to force Jon to commit more of his reserves prior to the issuing of the withdrawal order.

I'm off now to write up the next scenario.